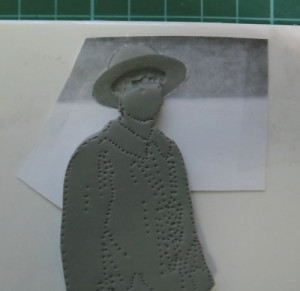
In the last instalment of this relief sculpt we left the figure in the silhouette stage, the excess clay had been removed and the hat had been carved from baked Sculpey then added to head section of the raw polymer clay.
With this stage completed, its now time to start the roughing out of the figure.
Finding the layers
As mentioned in the last article, I employ a method of ‘contouring’ to create shaped layers that define the levels (or heights and depths of the sculptures surface). In short – I remove layers of the clay to create an illusion of depth in what is a flat thin surface.
By studying the image of the Ambulance Woman I was able to roughly determine what was foremost and what I needed to push into the background. Using one of the print outs, I then marked it with highlighters to use as a reference.
The hat having already been created, I started on defining the figures right arm (which I knew was foremost in the image). To do this I used the perforated holes in the clay as a guide to run a craft knife around the shape of the arm and hand. I also cut into the folds of the coat and some of the larger creases. In some areas that I knew were deeper I also increased the depths of the perforations to, so that when the clay was removed I still had a guide to go to. Like the hat, the water bottle would also be made of baked Sculpey, so this was not cut into the clay.
With the lines cut I started to remove the clay layer by layer, stepping it by left to right (as you view it). A slope was created from the hem of the coat to the bottom of the water bottle and the bottom of her left arm was reduced down to about 1.5mm (but sloped up to the hand/shoulder bag). With some rounding of the edges it created the rough shape shown below.
At this stage don’t worry that your digging into other layers, by the very nature of this medium it allows you to repair any mistakes made very easily by adding more clay. This method of contouring (although essential to establish defined workable areas) is only one stage of the process, the real work comes from translating the image into the sculpted form (you’ll be pushing lots of clay around I can assure you!).
Knocking off the corners
In the next image, I’ve moved on quite a quickly (this is only a few hours work). Layers have been blended together (sloped from one to another in some cases), with some of the major creases created. I have also taken the head back to about 1.5mm, but left it blank to show a contour level (the face will be sculpted off the figure). You will also see that I have rounded some areas in an effort to establish an overall shape.
Knowing that the water bottle was an integral part of the sculpt (the straps dictate the coats creases) work stopped on the main body.
Taking a lump of Sculpey (slightly larger than the diameter of the bottle) I moulded into a tube shape over a cut off wood screw, then baked it in the oven.
Once the clay had cooled overnight the brass screw end was inserted in the chuck of a power drill (which I clamped in a vice) and the drill was used as a rudimentary lathe to turn the lump into a shape that resembled the water bottle (using files + wire wool).
Word of Warning – Please find an alternative way of creating items like this (you can simply make it from a blob of clay). I’ve a lot of foolhardy ways of making things on the cheap (I have years of experience and a lot of trips to to A&E to prove it!) I like the results they produce (not the pain!!).
The straps + the loops will be added later, but for the moment its time for one last image…
With the water bottle tried on for size, some more crease + fold work done, this is it for this instalment.
On the job list:
- Straps + water bottle loops
- Face to sculpt
- Shoes + hands
- Big tidy up – then first bake!
Lots to do – see you soon…
-Rich


Steven Lloyd
Rich, I am enjoying this very much. Keep up the great work. I want to try my hand at this and need all the help I can get.
Kjeld Buchholtz
This looks very promising, very detailed, is there a distibuter for this one, when it’s done? keep up the good work.
Kindest regards
Kjeld Buchholtz
Rich Odell
Hi Kjeld, thank you for your kind words – I am hoping to take some castings of this when it is finished. Will post updates on this site if distribution is possible. -Rich