After what feels like an age, I’m back in the saddle and continuing with the project!
The last couple of weeks have been a huge upheaval in the Odell household as a complete new heating system was installed. This meant that every room, carpet and floorboard was disturbed and all our possessions stored until the work was completed (including all my art equipment!). Still – all done now (thank goodness) back to the clay!!
This will be a small update to the last post…
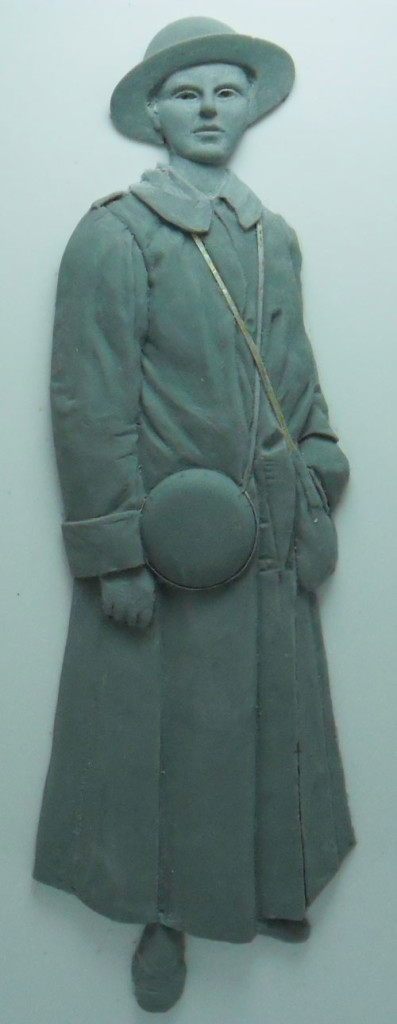
The overall effect
When contemplating how to explain this stage of the sculpt I was at a loss. I’ve done a fair few face/head sculpts in my time but when it comes to creating a face in relief, I’m still very much in the learning curve?
 In my previous sculpt the figure was a lot thicker, so I had a lot more lee-way with depth (the sculpt being more than 15mm in thickness), but with the current sculpt being not much more than 5mm thick, its a totally different ball-game!
Unlike ‘full figure sculpts’, I’ve found that you have to except that by its very nature, your dealing with a subject that can only be viewed correctly from one position. Now I know this stating the obvious but, there is a tendency when sculpting a relief to forget the overall effect, then ruin it all by plonking an overdeveloped, over-depth section of the sculpt that simply looks out of place.
What I’m trying to convey here is that details are great (pushing the boundaries of your skill-set is to be applauded), but consider the painter who is going to interpret the piece, look to develop the sculpt as a canvas for that artist, try not to over-work the subject (I’m certainly guilty of this – but I’m reining myself in!).
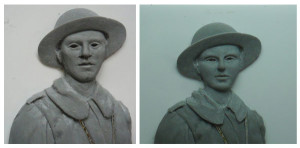
The face
In the first image you can see the that I have made a basic face shape in the clay. Using the print-outs I have used dividers to measure the faces proportions, then added the features bit by bit in the unset clay.
The second image shows the figure after it has been baked in the oven. It gets to a point with Sculpey at this scale, that its far easier to fire the clay and carve the face from the solid, than pushing clay around (which can cause way to many distortions to correct). I’ve used little more than a scalpel, a few needle files and a some home made scrapers to achieve this.
Got to say though – his face on this project has certainly chewed up a lot of time – more time than it should of have! I’m getting there with it but, I should have thought out the process a little more carefully as I found myself floundering a little working at this thickness. Still – almost there, a few adjustments to make, add the hair, tidy the neck and coat collar.
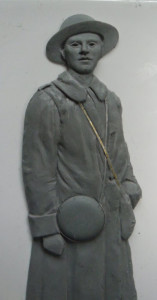
The body
 Prior to the first bake in the oven, the straps were added to the un-cured clay, so than they could be pushed into the surface a little (this helps with the shape of the clothing bulge that naturally rises either side of belt). The ends of the straps were then anchored under the collar, the other ends were bent at 90°, then pushed into the clay, I then blended the strap ends to the bag/bottle with a small amount of clay.
The straps were sourced from a metal paint tube, which was cut open, cleaned and flattened . This type of material is ideal when working with Sculpey as it will withstand the heat of the oven when baking. Its also flexible but will not spring back when moulded to the figure. The straps incidentally needed no glue to fix them (the tackiness of the Sculpey did the job!).
 After a little more tidying up (a few creases added here and there, hands, bag defined). The whole figure was baked in the oven at 130° for an hour, putting the figure in before the oven is at heat, then leaving it in until the oven has cooled after the set time. This I have found prevents any cracking, it also gives the figure longer in the residual heat which I find gives a harder, more workable medium.
In terms of major items that have to be added, I’m all but done…
- The neck of the bottle needs to be made.
- The loops to bottle strap need adding.
- The boots need to be defined.
- The hat needs to be flattened at the crown.
- Badges and hat band require fabricating
- The hair + eyes to add.
- Larger fold in the coat to be refined – smaller creases added.
- The whole figure cleaned, with any undercuts filled.
With all this done the figure will then be primed in grey. I will then commence what I feel will make or break the finish on the figure – a technique which I will share with you in the next instalment….
See you soon (I mean it this time!)
-Rich

Kjeld Buchholtz
Rich: My compliments, will be a figure I would love to put my brush on.
Kindest regards
Kjeld Buchholtz